


Photos taken by Zach Latimore on Finca Idealista Farm, Matagalpa, Nicaragua
For most people, coffee grounds represent the “end” of the coffee process. Everything that has happened to those beans since they were picked from the tree has been done with the end goal of roasting them, grinding them, and then brewing coffee with them. The grounds are the end state of a long journey.
Now, if you’re using your coffee grounds as a compost ingredient or even as a direct fertilizer, it may not make sense to say that those grounds are at the “end” of the coffee process, as beginnings and endings don’t fit very well into the cyclical nature of composting and gardening in general. Still, to see those grounds as simply the waste product of a beverage or a compost ingredient is to overlook a long, laborious, and fascinating process that produced those grounds in the first place.

In recent years there has been an effort among coffee roasters, brewers, and drinkers to get to know their coffee and its origins. The advent of Direct Trade has allowed many on the consuming end to learn something about those on the producing end, putting a face to what has long been a rather anonymous product. Another aspect of this effort to know more about coffee is the process itself. Not only is it great to know about who grew the coffee you’re drinking, it is also important to understand what the work was like.
This past winter I spent three months on Finca Idealista coffee farm in Nicaragua. November to February is the harvest season in Central America, so I got a great first-hand experience with everything related to coffee production. As a side project, I started a little organic garden at the farm mill using recycled materials I found laying around, which included lots and lots of coffee by-products.
Before I talk about the garden, it will be necessary to define what I mean when I say “the coffee process.” The coffee process is all of the steps it takes to turn coffee cherries on the tree into exportable, green coffee. Since I was in Nicaragua when I learned all of this, I learned all of the terms in Spanish, and I will keep them that way in order to differentiate between coffee at a particular stage in the process and avoid saying “coffee” over and over again, which would get confusing.


Very quickly, then, is the coffee process:
The Coffee Process
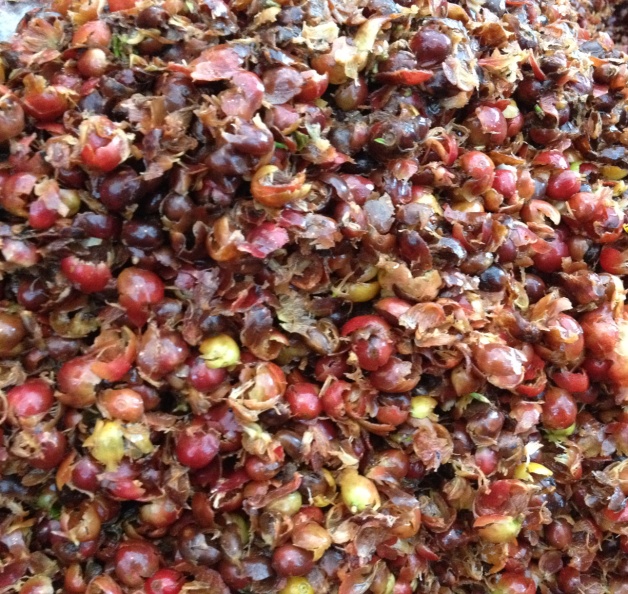
First, coffee cherries are picked from coffee plants. Ideally they are picked at optimal ripeness, when they have a beautiful deep red or, with some varieties, yellow, color. Coffee at this stage is called uva.

Then, depending on the style of processing, the coffee will either be de-pulped and fermented (washed), de-pulped and immediately set to dry (honey process/semi-washed), or set directly to dry without depulping (natural process).
Honey process and natural process coffees are known for their exotic, fruity, sweet, and otherwise interesting flavors, but they’re also difficult to pull off, especially when you’re a poor, rural farmer with limited resources.
For that reason, the vast majority of coffee in Central America is washed. And don’t worry, washed coffee is by no means inferior- as long as you take care during processing, it will still be awesome.


The depulping process is usually done with a machine designed to separate the beans inside the cherry from the skin of the cherry itself. Even for a modestly sized farm such as the one I was at, you’re still depulping hundreds of pounds of coffee at a time. That means you end up with a lot of pulp.
You can see in the layers the different rates of decomposition. And keep in mind that the upper layers are less than 24 hours old, while the lower layers are no more than a few days. This stuff decomposes fast.
Coffee pulp is an interesting material. In the picture on the right below is fresh pulp, which still retains those lovely red and yellow colors. On the left is a picture I took after digging away in a mound of pulp.


After the coffee has been depulped, it is put in a tank to ferment for one to two days and then washed in small canals to remove defects and clean off the sticky mucilage from the beans in order to stop the fermentation process. It is then put out in racks to dry.
At this stage it is called pergamino. In pergamino, the beans are still within a papery sheath that protects them (pergamino is Spanish for parchment). Underneath that sheath is a very thin layer, and then the bean itself. Freshly washed pergamino is known as pergamino mojado, or wet pergamino. Once the pergamino has dried enough to be dry to the touch, it is pergamino oreado. At this point the moisture in the bean itself is about 44%.

The pergamino must dry to between 12% and 13% humidity to be considered ready for reposo, or rest, for the coffee. This just means putting the coffee into a sack to allow the remaining moisture to distribute evenly throughout the coffee. Ideally the pergamino has been turned and stirred constantly in the time between washing and reaching that 12% to 13% level in order to promote even drying, but good reposo is still necessary to produce top-quality coffee.
After reposo, which lasts about a month, the pergamino seco, or dry pergamino, is ready to be stripped of its parchment, exposing the green coffee beans inside. Like depulping, this is usually done by machines and results in tons by-product, in this case pelusa, or ground up parchment. Pelusa, as ground up pergamino, is very light and dry, almost dusty feeling. After removing the pergamino, the coffee beans are then sorted according to size and weight and then a combination of machine and human sorting is done to remove defects.

Now the coffee is called oro, the name for green, exportable coffee.
Oro is shipped abroad where your favorite small-batch, artisan roaster roasts it up and you or your favorite local café grind it, brew it, and then, at long last, those grounds are ready to be added to your home garden!
The Compost
The coffee process, then, results in two main by-products- pulp and pelusa. Luckily, pulp is a nutrient-rich material. It is relatively high in nitrogen and potassium among other beneficial organic qualities.
It is already common practice among coffee farmers to toss pulp at the base of their plants. In fact, at one farm I visited, I was astounded by the lush, deep greenness of coffee plants as far as I could see. I wasn’t surprised to hear that this particular farmer practiced this sort of disposal with his pulp.
The other great thing about coffee pulp is that, when left in giant mounds, as it almost always is, it rapidly heats up to a pretty high temperature as it decomposes. This of course is true for most organic materials left in giant mounds, but with coffee pulp you have a material with the right size, consistency, organic content, and quantity to be able to consistently and quickly achieve these temperatures.
Pelusa, on the other hand, isn’t as rich as pulp. However, its dryness and fluffiness makes it a great partner for pulp, which decomposes into a dense, sticky, heavy mass that can be difficult to work with. And, like pulp, you produce tons of pelusa during the coffee process, so you might as well find some use for it.

When I arrived at the farm, there was already a compost area, saving me many hours of hard work. The compost had been mixed in some deep pits. Apparently the pits were left in the ground from the previous coffee mill on which the current one was built. They allowed one to mix large amounts of compost without taking up tons of surface space. I’d like to thank whoever prepared all that before my arrival; no hard work goes unnoticed at Finca Idealista.
Because there were three of them, I was able to designate them as long-term, medium-term, and ready-to-go compost, adding organic material of various sizes to the appropriate pit.
When I finally used up all of the ready-to-go compost in the garden, I made a layer cake of pulp and pelusa, alternating layers of each in one of the pits like so:


When it came time to transplant, I dug out a little hole for each plant and added compost, planting each seedling into its own compost hole. Onions and carrots were direct-seeded into a full layer of the stuff about two or three inches deep.
If there was something about coffee pulp compost that would kill the plants, this would be the moment.

The nature of the pit makes the compost rather difficult to turn, and for that reason the previous year’s compost was basically a mass of pelusa at the bottom with an extra heavy, dense mass of pulp on top. Hopefully layering the two will prevent that in the future and also make it easier to turn, which is quite a chore when it’s in a hole in the ground. I can’t wait to see how it turns out next year. Even after a few days it had already sunk down in the hole a bit, so I added a few more layers.
The Garden
One of the disappointing things about cash crops like coffee is that they de-incentivize holistic approaches to farming in favor of pumping every available resource into the money-making crops. This results in strange situations such as seeing poor farmers using their money to buy fruits and vegetables, or having difficulty finding tomato or cucumber seeds in an agricultural region with an ideal climate for growing such plants.

All of which is to say that the garden I started at the farm had a bit of a mission behind it, although it was also a project simply of my own gusto. Finding seeds for a small garden in Matagalpa, Nicaragua isn’t as easy as you’d expect. Most agricultural stores either didn’t have them or only had them in quantities for planting a few city blocks’ worth.
Eventually, however, I was able to find tomatoes, cucumbers, a little type of pepper called chiltoma, jalapeño, onion, and carrots. After soaking the seeds in water overnight, we planted them in egg cartons using a mix of old coffee pulp compost, super rich soil from the mountain near the coffee plants themselves, and sand. I was told to expect a germination rate of 0-10% but to my surprise it was near 100%!
The next week or so was spent prepping beds for when it was time to transplant. The soil around the farm’s mill (which, it should be made clear, is different from the actual coffee plantations) wasn’t terrible, but high clay content kept the soil too dry in periods without rain, and there were weeds to be cleared too. It took me about two weeks to clear weeds, dig drainage ditches, and hack the soil into chunks more appropriate for mixing with compost.
Once done, however, it all looked pretty inviting.


Instead, however, they all responded very well, shooting up and growing at an ever faster pace. Despite daily watering, the soil kept drying out more than I would have liked. A nice thick layer of pelusa mulch solved this problem, however. The pelusa didn’t necessarily hold water as much as some wood shavings we gathered up and used as well, but it did keep the soil underneath nice and moist and also prevented weed growth.


All in all, the compost contributed to a vibrant, healthy garden. Despite my continual accidentally killing the tomatoes, they consistently rebounded and kept growing. At about two months the cucumbers and tomatoes were flowering but sadly it was then that I had to leave, never to enjoy the fruits of my labor.
The Conclusion
Using coffee pulp and pelusa in compost is only one of many uses for those materials. Pelusa can be used as a fuel source and there has sprung up a veritable coffee industry around testing and finding new uses for coffee pulp, from animal feed to mushroom cultivation to biogas to tea to flour. As in, flour for baking. None of these uses, however, has been adopted on a large scale. The recent boom in coffee has so far outpaced efforts to make the process more efficient and less wasteful. As it is, most farmers might throw their pulp on the ground around their plants, but that it about the extent of their use of it. Since there are so many more tons of pulp than could possibly be used as fertilizer, it is a shame to see it go to waste when, with the right structures and mechanisms in place, it could be another source of income for farmers who often need to squeeze every penny out of their crops.

More than the economic issue, however, is the environmental factor. The same nutrients that make pulp such a rich compost material also mean it is slightly toxic for the environment if not disposed of or composted properly. Furthermore, the depulping process uses a fair amount of water, and washing the coffee uses much, much more.
Both of these processes load the water with the mucilage of the coffee bean, a slimy material that, like the pulp, is slightly acidic. And, since most farmers get their water from whatever nearby river they can and run the post-mucilage water back into those rivers (sometimes dumping pulp directly into the water as well), contaminated water supplies have been an issue in many coffee producing countries.
Again, the rapid and widespread adoption of coffee as a crop by farmers in developing countries can be seen as the source of the issue. The farmers oftentimes have either lack the education of the danger of their methods or the resources to make the appropriate changes if they wanted to. I was lucky to be working on a farm that had an expensive multi-stage volcanic rock water filter for all of the water used for washing coffee. After several stages of filtration the water went to a large pool where it slowly absorbed into the ground. Even then, however, the water needed time for for oxidation to occur to lower the acidity. I couldn’t imagine that stuff going straight back into the river, as it does in many farms around the world.
Hopefully as awareness, resources, and legislation catches up to the coffee boom, we will see more organic, healthy uses of coffee materials.
If you’re interested in more reading, here are some related links:
The Gold Mountain Coffee Growers website


Leave a Reply