Build a pond for frogs or fish or fun
If you want to get the most from your garden, then find a place for a pond or two.
Not only can you use a pond to attract frogs and beneficial insects; water is a very effective place to grow food, and according to those involved in an aquaculture, more effective than a soil based equivalent.
This article is not about the benefits of incorporating water into your garden, but rather a practical guide on how to build a pond with car or truck tires. Having done this twice now, I can point out some of the things done wrong along the way, and hopefully step you in the right direction.
But first, let’s take a moment to admire the finished product (just click on that arrow to start the video):
Choosing the Correct Tyre
The first step is to get a used tire!
There are plenty of places you can find them, including your local tire retailer. They always have old ones around the place, and the shop owners I approach are more than happy to give away whatever they have.
The tires I found for this job are sized 295/80, which are the types that can be fitted to trucks and buses. When prepared according to the steps below, they should hold somewhere between 150 to 200 litres – how much depends on the size of the concrete cap you make, and we’ll cover this further on.
A tire of this size is fairly heavy (approx 50 kilos), so unless you are comfortable throwing that weight around get someone to help you out with the transporting and lifting.
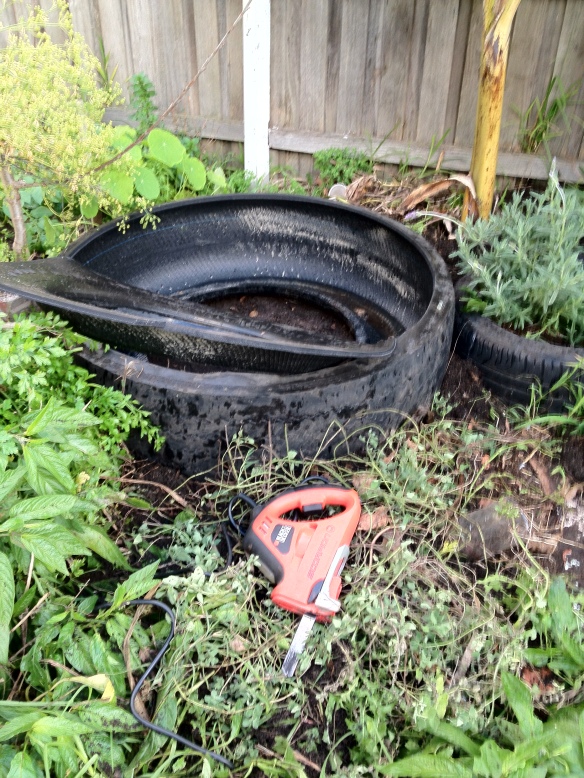
Now you have it home, next step is to cut out the top facing wall. The easiest way to do this is with a jigsaw or electric saw.
Do not try this with a circular saw or grinder with cutting blade, unless you want a mountain of rubber smoke stinking up the neighbourhood. Something to do with the high speed of a circular saw perhaps – go with a straight blade or jigsaw as below.
Once you have the top wall removed, this is a great time to site the tire pond where you want it, and then spend some time levelling it off. You don’t need to have it perfectly level for it to work, but you wont be able to fill it to capacity unless it is straightish.
At this point you can dig out some of the soil from the middle, and this will increase the volume of water your pond will hold.
How to Seal the Pond – Plastic or Concrete?
This is not the first time I’ve tried to make a tire pond – and in the first case a plastic liner was used and it didn’t work out. Being sloppy in the preparation led to a leak, just a little one, and that was enough to drain the pond within four weeks.
When thinking about the second attempt, I was in the middle of researching about a thicker plastic liner, and an underlay to go with it, then came across information about the benefits of using concrete.
Concrete costs more or less the same as plastic, lasts longer, and although there is a bit more to do in the preparation stage, it suits those of us that don’t want to worry about a tiny tear literally washing away all that hard work and effort.
Plus, there is a certain sense of manliness when one prepares and then applies concrete. Everything from the mixing shovel to the boots and the smell of cement and water, the noise of metal scraping sand. Manly!
OK so you know my thoughts on the matter – here is how you prepare for concrete.
Prepare the Base for Concrete
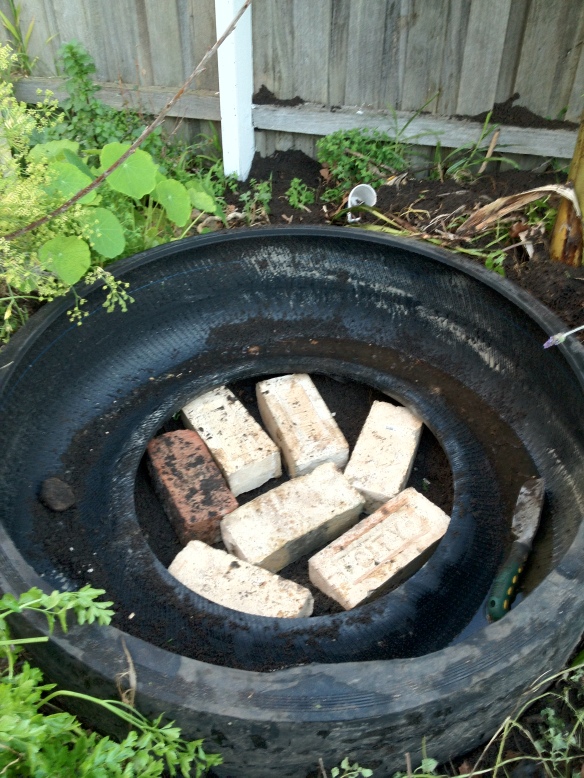
Clean out the tire of dirt and debris, then fill the base with bricks or something similar. This will strengthen the plug you are about to make, and save on the amount of concrete you need to use.
How to Make the Right Kind of Concrete
Unsure of what specific type of concrete to prepare, I came across a fantastic website written by a professional pond building company. Without doubt this is a fantastic mixture which set quick and hard, and without any problems.
The ingredients and ratios are:
- 1 part Portland cement
- 2 parts course sand
- 3 parts pea gravel
You could also buy a pre-mixed sand and cement mixture in roughly a 2 to 1 ratio, and then add that to the pea gravel.
Slowly add water to the mixture until it has a consistency of wet dough, about to the point where it will cling to the shovel for a second before sliding off.
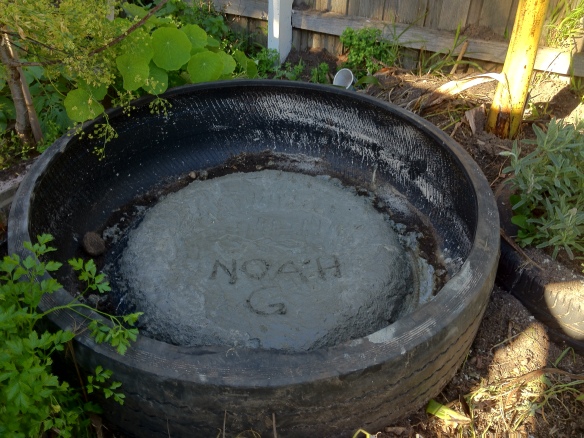
Now pour it over the bricks and into all those gaps between the soil and the inside lip of the tire, and you might find that doing it by hand (with a glove), will make it easier to push into any open spaces.
This is a good opportunity to customise your pond, and writing in concrete is a really fun thing to do (it is now a signature pond!).
What you should end up with is like a concrete muffin top that spills over the inside lip, and this is what is going to stop water from ever leaking out.
I recommend that you leave this to dry for 4-6 hours, or until you can knock on the concrete without a knuckle going through it. No need to wait a day or two, as getting to the stage of adding water sooner will result in the still curing concrete to become much stronger and longer lasting.
Using a Water Sealer to Finish the Deal
 This step is optional, and recommended. No point going to all the trouble of making a pond, filling it with water, fish, plants, and then finding one day that it has all leaked out across the yard. Not pleasant!
A water sealer becomes the final barrier between the water and the outside world, and should be applied generously with 2-3 coats, allowing for at least 6 hours drying time between each coat.
With the final coat applied, allow to dry for a whole day, then it is time to test it out!
Waterproofing Test
First, brush out as much loose debris from the plug and base of the tire as possible. This might include sand and remnants of concrete, flakes of sealer, twigs, stuff like that.
Splash in a few litres of water and if it is still obviously dirty then clean up with a soaker, getting any pieces of dirt out with it. You might also find that a glass jar works well to scoop out the settled sand and dirt from the base of the tire. Avoid using a metal equivalent that might catch on the rubber or even scrape off some of the sealer.
Now add water to settle just over the plug for a couple of days, and keep an eye on the levels.
Filling the Pond (and second waterproofing test)
So far, so good. Now fill up the pond close to the top and leave for another couple of days. If the level stays more or less the same, you are (almost certainly) leak free!
Now with the utmost confidence that you have built a tire pond to last, it is time to make it more visually appearing, and productive in use.
Making Your New Pond a Home
Dressing up the tire is mostly a matter of trying to hide some of the rubber.
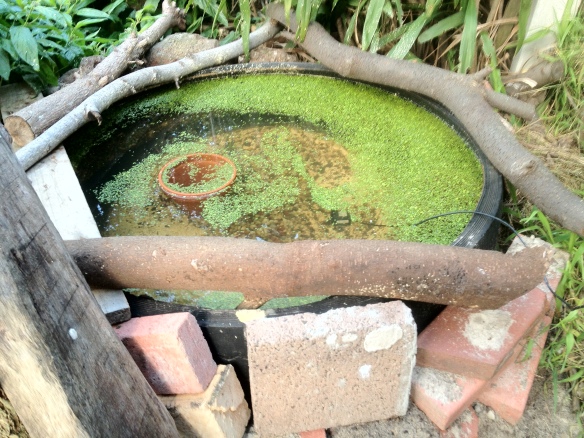
As you can see from little time time spent in the photo below, some logs and bricks give it a rustic enough feel, and for me that was plenty. You might have other things in mind and there is no limit to dressing up a tire pond to make it look as natural as you like.
One design that I’ve seen, but didn’t build, is to surround the tire one foot out with chicken wire, then fill the gap with soil. This gives you a place to have additional plants and over time it completely hides the rubber, also providing a growing space for march or bog plants.
Making it look pretty is one thing, but the real benefit of an aquaculture is to (hopefully) grow some food, and to attract frogs and beneficial insects.
I added to this pond (once it was full, not leaking, and not ugly enough to not scare off the kids):
- One cup full of Duckweed
- One cup full of Azolla
- Half a kilo of pea gravel
- Half a kilo of course sand
- One solar powered water pump
- One Arrowhead (duck potato) tuber in a terracotta pot
- One Pickerel Rush in a terracotta pot
- Four Murray River Rainbow Fish (mosquito control)
Some Examples of How NOT to Build a Pond
Any good post about how to build a pond should also include first attempts, so here goes.
The below is an example of a tire pond with plastic lining, and all was well for the first month, and then water levels started to drop.
There was no obvious signs of leaking, and at first I thought it was the solar pump that was somehow shooting water out, even though that did seem kind of impossible, what else could it be?
So I filled it again with some aged rainwater and hoped for the best, and all was good for another couple of weeks.
Strange how it stayed full for that long, because just as suddenly, the water dropped level to the inner lip, so obviously there was a small tear in the plastic due to my own lacklustre construction efforts. Yes concrete is much more forgiving than plastic!
And this sad looking pond image below was an attempt to build something on the cheap, very cheap. Those clam shell sand pits can be used for holding water, but my experience is that it holds too little water (approx 50 litres), to keep plants and fish alive in it for too long.
Plus it was an ugly puke blue color that got me a heap of crap from my fellow gardeners. The most common words of wisdom being ‘That pond is a real natural shade of blue…’
Time for you to Get Building
So folks, I hope that you now have enough information to get started, or at least to add it on your list of things to do. If you have any questions leave them in the comments, or send me photos of your own little tire pond adventures 🙂
Related articles
- Don’t Make These Mistakes When You Build a Pond in Your Garden (groundtoground.org)
- Garden Frog Pond (mummylovestea.wordpress.com)
- The Circle of Life in Our Own Pond (primroseblog.wordpress.com)

Pingback: 5 Budget-Friendly Small Ponds You Can Build Right Away - Coziem
WELL ” I ” HAVE A TIRE POND—-(TIRES FROM PAY-LOADER ) TWO IN-GROUND ONE ABOVE.===BEEN IN YARD–11–YRS-NEVER LEAKED–EVEN AROUND TOP-TIRE..AROUND TOP TIRE–GORILLA-GLUE AND CONCRETE—-MY WIFE AND SOULMATE DIED DEC-3RD–2016–FROM CANCER @-43-YRS.. POND STARTED LEAKING….I WAS RE-DOING POND WHEN SHE DIED–I’M NOW 74–A LITTLE OLDER. BUT ””GOD”” JESUS AND MY ”’OMIE JEAN HELLER ARE WATCHING…
GOD BLESS———–YA–ALL !!!!!!!!!!!!!! P.S.S. TURTLES, MONSTER FROG—AND A GATOR VISITS ONCE IN A WHILE………………………………AMEN….
LikeLike
Pingback: How To Build An Above Ground Concrete Pond | Asia Bank
Pingback: How To Build An Above Ground Fish Pond | Africabank
Pingback: Attracting Wild Animals for the Good of the Garden: Which, Why, and How
Pingback: VIDEO Cum să faci un mic iaz dintr-un cauciuc uzat | TOTB.ro - Think Outside the Box
Reblogged this on goldcoastgardendiary and commented:
I’d like to try this, I think its a great idea. I used some tyres to hold back the soil on my last no dig garden, if I had seen this first I would have cut the tops off the tyres. It’s a much better result.
LikeLike
Pingback: The Polystyrene Beehive Project – Part 1 | Ground to Ground
so the plastic from the tire doesn’t hurt the fish?
LikeLike
This is actually a really clever idea and is such a cool way to recycle old tyres! How are you finding the solar pump to be? I use the Aquamax pond pumps in my pond and it does a great job of helping to clear the algae. Out of curiosity, how many fish do you think you could fit into your pond?
LikeLike
Hi Laura – the solar pump is reliable but does not actually pump that much water. It seems to move the water around but would be surprised if it was doing more than 10 litres an hour. That said, nothing seems to kill them, so a great investment.
LikeLike
I am looking into aquaponics/ catfish with vegetable. I will have to grow the fish for 18 month in 70F water. This will take them from fingerling to 1-1 1/2 pound fish.
I am looking into rocket mass stove & solar for the warmth. Maybe a greenhouse with solar panels. If I get it off the ground I will send photos , but that will not be for many months.
LikeLike
Wow mate that sounds like a great set of projects. Been thinking about the mass stove but just not enough hours to get it underway. Big fan of aquaponics, with a tank full of silver perch and catfish, feeding a clay bed of garlic, parsley, kale, beetroot and so on.
LikeLike
Nice idea using the concrete! See this site for a double-tyre pond: http://www.instructables.com/id/Fish-pond-from-tractor-or-car-tires/
LikeLike
Yes thanks Philip. Had a bad experience with plastic so will only go concrete from now on. They are doing very well and expect to get another 50 years out of them!
LikeLike
Ah. What was the problem with the plastic?
LikeLike
I think it was me more than the plastic. Was a bit sloppy with the plastic and sharp objects, and can’t go wrong with a tire and concrete. Hopefully it lasts longer than the plastic would have also – expecting a couple of decades from these.
LikeLike
Reblogged this on Localista and commented:
Coffee Grounds to Ground posted this small-pond project. I don’t know why, but this snowy weather has me thinking about spring projects…
LikeLike
Fantastic – thank you Shelley! If you need any more help just let me know.
LikeLike
I am going to reblog this on Localista (formerly Outside the Box). We had our first snow storm in Maine yesterday…so of course I now want to think about spring projects (eyeroll).
LikeLike
Wow what a great idea to have mini ponds. There are many products available to add the necessary microorganisms to the Orange County water ponds. Once these have been added it will work to decrease ammonia and nitrates and increase the overall oxygen content. The result is a drastic reduction in the presence of algae as all organic content is broken down without any harm to the fish present in the water.
LikeLike
Thanks Howland. You were so sincere I just had to let you include the link 😉
LikeLike
Pingback: Water Spider Hunting Mosquito | Coffee Grounds to Ground
It would be great for bees, if you had an landing zone for them.
I would use food grade plastic drums as a pond.
They hold more water, are less likely to leak chemicals into the water, will last as long as tires.
I would cut them vertical , then lay the half in a small trench & fill in around it. You could build the rest of the pond as above.
The last reason for using the cleaner, food grade drum is that I can get them free here in town.
LikeLike
Will fill in the spaces for insects to land on, just waiting for the duck potato to start spreading out, and the Azolla is getting thick in places.
I’m using those plastic drums already for water harvesting, and did think to make one into a pond. But tell me, when you cut them in half and lay them down would you join them up or keep them as separate ponds? I guess each one would hold about 100 litres each.
LikeLike
I would put them end to end, but not so the water could flow from one to the other.
You could join them if you have a reason for it, I just have not had one.
LikeLike
Well mate I’m about to build the third on so might give that way a go.
LikeLike
I wonder if the pond could serve as a watering hole for the bees. Looks like you have plenty of natural landing pads so they won’t drown.
I like the idea of recycling an old tire too.
Good work!
LikeLike
Thanks mate – from the looks of things it is attracting honeybees and plenty of other flying insects, including hoverflies and what appear to be smaller native bees.
LikeLike