What is Worm Tea?
I started this post trying to describe ‘Worm Tea’, and before too long ran into all kinds of ways to name it and make it.
So let us start with this general rule – that ‘tea’ is all the goodness of the worm farm in water, and then putting that directly into the soil or onto the plants.
Worm Team can be made in a dozen different ways with a variety of ingredients and range of preparation. Some people drop vermicast into a bucket of water, stir it once a day for a week and use that. Some use compost in water and still call it worm tea.
Yet again, others swap or interchange the term ‘worm tea’ with ‘worm wee’, ‘worm pee’, ‘compost tea’, ‘worm juice’, and also ‘worm lechate’. Any combination of – worm, wee, and tee!
If you need more background info, follow this link for one of the better articles on what worm tea is all about, and is in-line with my thinking.
For this article, I am going to describe how I prepare and use ‘worm tea’ – so let’s get to it.
Equipment to Make Worm Tea
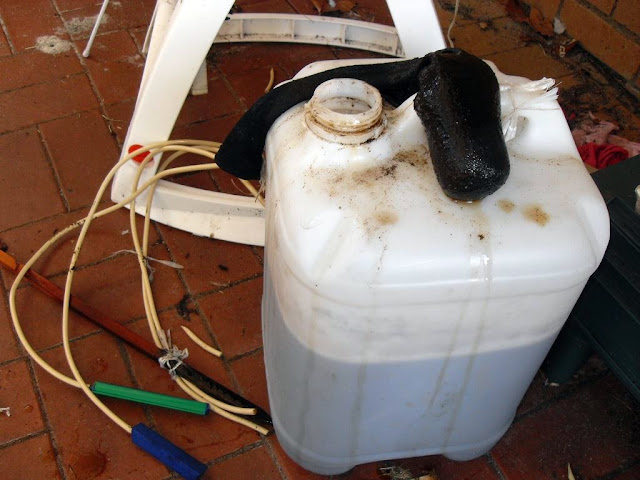
Containers – I’ve been using these 25 litre food grade plastic containers for a while now,  and they do the job just fine. Plenty of small business owners buy these full of detergents or food stuffs, and have nothing to do with them afterwards except give them to grateful people like myself!
They might not always be empty so keep an eye out for any dangerous chemicals, and do soak and wash them with water. One took me a week to flush out the detergent from and you might have the same experience.
Rainwater – Is what I recommend for the job but if you need to use chlorinated tap water , let it sit for 24 hours in an open container before using. That is about as long as it takes for the chlorine to evaporate, and unless its all gone those bacteria wont have a chance.
.
Gloves and a sock / stocking – You need the gloves to keep vermicast out of your fingernails (unless you are into that dirty hands sort of thing), and the sock / stocking to fill with vermicast.


Vermicast – Yes it is 100% worm poo, distilled through the bodies of the finest earth worms available.
Try to get the castings closest to the top, because that will have the highest concentration of beneficial aerobic bacteria.
.
Molasses – Use unsulphured Molasses, which might mean a trip to the local health food store. A larger grocer may stock this type. You need molasses  because this is going to feed all those billions of beneficial bacterial.
Without a food source you will end up with few bacteria and poor quality worm tea. And you need to avoid sulphur because that is an anti bacterial fungicide, and will kill off the bacteria before they can be applied to the plants.
Air Pump – Use this pump to add oxygen to the water, which bacteria require to survive (because what we want here is the air loving, aerobic bacteria).
I’d recommend you get an air stone  or two, because that is exactly what they are made for – forcing thousands of tiny air bubbles through the water.
Steps for Preparation of Worm Tea
- Fill the socks / stockings with the vermicast. My own preference is to use stockings because it allows for better air flow, but a sock will do if there is nothing else. Don’t be fussed if there are still worms crawling around in the mixture, as they can survive in highly oxygenated environments, even underwater for a couple of days (see video below)
- Add the rainwater into the container, then suspend the stocking in the middle of it.
- Add the air pump tubes – turn on the pump. Check to see they are secure at the bottom of the water and not just sitting at the top.
- Pour in the molasses over the suspended stocking – about 2-3 tablespoons per 20 litres. Some brands are as difficult to pour as thick honey, so mix in warm water beforehand if needed.
- Run the pump from 24 to 48 hours, adding 2 tablespoons of molasses every 12 hours.


The worms will do just fine underwater for a day, as you can see in this video, after 24 odd hours they didn’t seem to be aware of the problem!
OK so it has been brewing for a while – you now have 8 hours to use it all from the time the air pump gets turned off (aerobic bacteria will start dying off when the bubbles stop).

Pull out the tubes and wipe the gunk off the air stones – It is a good sign if there is a slimy coating on everything. To clean, dunk the tubes and stones into a separate bucket full of tap water (and this is a case where chlorinated water will help), and turn the pump back on.
Remove the sock carefully to avoid wasting the precious liquid. Turn the sock inside out and remove the contents (now a muddy slush), around something that deserves a supercharged serve of goodness.
And into the bucket goes the worm team…

The video below shows what it should look like as you pour it out.
When and How to Apply Worm Tea in the Garden
Now it is just a case of getting that worm tea into your plants!!
- In either early morning or late afternoon, take the bucket full of worm tea to a plant
- Pour some of the contents from the leaves down, until it is all soaking the soil
- Move to the next plant and repeat 🙂
- If you want the control (and waste minimisation), of a hand held spray bottle, filter out any gunk with mesh or a strainer. A blocked spray bottle will just plain ruin your day.
- You can make the tea last longer by mixing 50/50 with rainwater, but I never do. Why dilute it when you can just make more?
As you can see in the photo below, this little tap is perfect for running out the liquid without having to worry about blockages. This means I can brew the tea in the same container I pour from. Could not be easier.

And if you still thirst for more about this tea, sip from the document below:
Ok so that about covers it for worm tea, for now. I’ve developed a couple of different brews even since starting this post, and learning more about this potent liquid fertilizer each and every time.
Give it a try, and let me know what you see as a result!
+Shane Genziuk
Related articles
- Using Worm Castings & Worm Tea (urbanfig.wordpress.com)
- Eisenia fetida, or the Little Worm that Could (Getting Started) (spacefarms.wordpress.com)
- Worm Farming-Vermicomposting (giantveggiegardener.com)


when we apply the worm tea ???
LikeLike
As soon as it is ready – leave it too long and it is much less effective.
LikeLike
I am using my honey from the bee’s i have now……..awesome results, table spoon of chicken poop when I need a nitro booster,
LikeLike
Ahhh – great advice thank you.
LikeLike
Pingback: Address Environmental Problems With Organic Gardening | Ground to Ground
Pingback: Coffee Grounds are Worm Crack! | Coffee Grounds to Ground
Pingback: Aphids Control | Coffee Grounds to Ground
You can also use honey, Kelp, Bat S&^t, and fish emulsion for different results.
LikeLike
Yes definitely recommend the fish emulsion – yet to try bat **** and when I find one flying around will try to get a sample
LikeLike
Pingback: Urban Worm Composting - Leachate: Friend or Foe?
Pingback: Compost Tea…A Most Beneficial Brew! « Fire and Ice Blog
Pingback: Some Dos and Don’ts of Worm Farming | Coffee Grounds to Ground
my worm tea is really starting to look better, This has been by leaving it brewing for 36 instead of 24 hours. It has a real scum on top of the water at this stage. In case you are wondering about the electrical cost of running the pump for 24 hours. It is only a couple of cents. I use treacle instead of mollasis as it is a lot cheaper. Seems to work.
Question I can see small white insects crawling around my castings when I put them on plants. Anyone know what they are. I just suspect they could be baby whiteflies. Tell me they are not!
LikeLike
Hi mate – fairly certain that is what they are and they never seem to cause a bother. Do you keep adding the treacle over that time and if so how much how often?
LikeLike
Thanks Shane. Pinned this for future reference.
LikeLike
Thank you! When you guys come around next month I’ll have another batch ready for you 🙂
LikeLike
Excellent post thank you Shane. This has all the info I need to make some worm tea and then some, plus it doesn’t look that hard to do.
LikeLike
No not at all Jo, some folk don’t even bother with the air pump. Give it a try and let me know if I can help.
LikeLike